Beginner's guide to getting started, code examples and templates
AHK a scripting language for Windows to automate tasks, create keyboard shortcuts, build macros, develop graphical user interfaces and more. It compiles to .exe in a single click! Their documentation is extensive so I've put together some code so you can easily get started creating your own program.Beginner's guide to getting started
Let's create a low-complexity boiler plate to familiarize.Prerequisites
- Download AutoHotkey V1.1 from their official website.
- Get your favorite text editor ready. For AHK i like to use SciTE4AutoHotkey.
- Open your text editor and add this block of code below to the beginning of all your AHK scripts.
- anything written after a semi-colon
;is a comment used for note taking. It does not get read by the script and is only for developers to keep track of their code. You can see them being used in the block below. - Add this block of code below to the end of all your AHK scripts to ensure the app quits running when the GUI is closed.
SendMode Input  ; Recommended for new scripts due to its superior speed and reliability.
SetWorkingDir %A_ScriptDir%  ; Ensures a consistent starting directory.
#SingleInstance Force  ; Replaces old instance of script automatically.
guiclose:
exitapp
Your text file should now look like this. You are now ready to begin.
SendMode Input  ; Recommended for new scripts due to its superior speed and reliability.
SetWorkingDir %A_ScriptDir%  ; Ensures a consistent starting directory.
#SingleInstance Force  ; Replaces old instance of script automatically.


guiclose:
exitapp
Creating the GUI
Graphical User Interface
We will start with creating the GUI. Place the code below into your script between the two blocks of code above.
We will start with creating the GUI. Place the code below into your script between the two blocks of code above.
gui, show, w500 h200, massi.net AutoHotKey starter kit
gui, font, s20
gui, add, text, x90 y20, Low complexity boilerplate
gui, font, s12
gui, add, button, x25 y+20, Show text in box
gui, add, edit, x+50 w200 vtext,
gui, add, Button, x25 y+20, Load checked programs
gui, add, CheckBox, x+20 vnotepad , Notepad
gui, add, checkbox, x+10 vcalculator, Calculator
gui, add, text, x20 y+30, Change GUI color
gui, add, radio, x+20 group vrad1, white
gui, add, radio, x+20 vrad2, blue
gui, add, radio, x+10 vrad3, green
gui, add, radio, x+10 vrad4, red
This is the end of the GUI. Add return to the end of the script.
return
✂
Your code should look like this. It has no functionality yet, just a GUI.
SendMode Input  ; Recommended for new scripts due to its superior speed and reliability.
SetWorkingDir %A_ScriptDir%  ; Ensures a consistent starting directory.
#SingleInstance Force  ; Replaces old instance of script automatically.

gui, show, w500 h200, massi.net AutoHotKey starter kit

gui, font, s20
gui, add, text, x90 y20, Low complexity boilerplate

gui, font, s12
gui, add, button, x25 y+20, Show text in box
gui, add, edit, x+50 w200 vtext,

gui, add, Button, x25 y+20, Load checked programs
gui, add, CheckBox, x+20 vnotepad , Notepad
gui, add, checkbox, x+10 vcalculator, Calculator

gui, add, text, x20 y+30, Change GUI color
gui, add, radio, x+20 group vrad1, white
gui, add, radio, x+20 vrad2, blue
gui, add, radio, x+10 vrad3, green
gui, add, radio, x+10 vrad4, red
return


guiclose:
exitapp
Run your code by saving it and double clicking the file or press the play button if you are using SciTE.
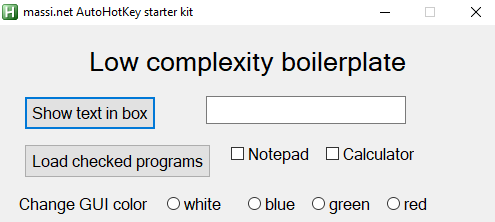
The buttons don't do anything yet. Let's continue.
Adding functionality
Adding functionality
Now that we have our GUI ready let's add some functionality.
Now that we have our GUI ready let's add some functionality.
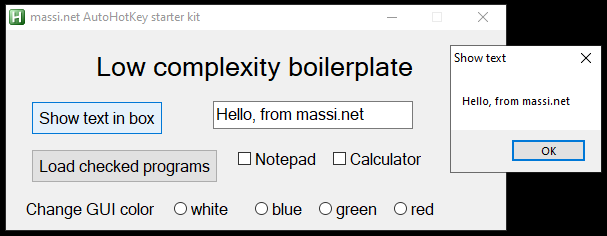
The first button will show in a message box what was typed in the edit box. That action will be titled
show
- We must assign the button that will use this action the "show" variable. Action variables start with
g
gshow variable to the "Show text in box" button from before. The line should now look like this, after adding only gshow to it. You are not adding this line to the code, you are only adding the the 'gshow' action variable to the 'Show text in box' line
gui, add, button, x25 y+20 gshow, Show text in box
Let's create the action labeled
show:
- Button labels are followed by a colon
: - To fetch the information and pass it into the program we must add
gui, submit, nohideto the beginning of the function. - That will be followed by a message box with the title "Show text" that will grab from the variable "%text%", defined in the edit box earlier as "vtext". Dynamic variables must be enclosed in % signs.
- "return" will end the function.
show:
gui, submit, nohide
msgbox,, Show text,%text%
return
Let's create the action labeled
run:
The second button will load the programs checked in the check boxes. Like before we must assign the button that will use this action the "run" variable. Add the grun variable to the "Load checked programs " button. You are not adding this line to the code, you are only adding the 'grun' action variable to the 'Load checked programs' line!
gui, add, button, x25 y+20 grun, Load checked programs
- Like before to fetch the information and pass it into the program we must add
gui, submit, nohideto the beginning of the function. - This action will have an "if" statement. "If" statements must have a variable and parameter. Our variable will be "notepad" and parameter will be 1 or 0. Checked is 1, unchecked is 0
- The conditions must be enclosed in regular brackets, and the action must be in curly brackets. The action will be to run notepad or calculator.
run:
gui, submit, nohide
If (notepad = 1) {
	Run, notepad.exe
}
If (calculator = 1) {
	Run, calc.exe
}
return
Let's create the action labeled
change:
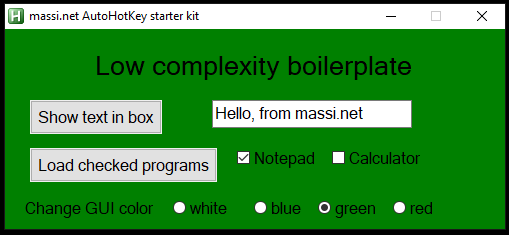
The third action will change the color of the GUI depending on what radio button is checked. Radio button groups can only have one button marked at a time. - Like before to fetch the information and pass it into the program we must add
gui, submit, nohideto the beginning of the function. - Like before we must assign the buttons that will use the action label the variable "change".
gchange to the radio buttons.
You are not adding these lines to the code, you are only adding the action variable 'gchange' to the color lines!
gui, add, radio, x+20 group vrad1 gchange, white
gui, add, radio, x+20 vrad2 gchange, blue
gui, add, radio, x+10 vrad3 gchange, green
gui, add, radio, x+10 vrad4 gchange, red
- Like before to fetch the information and pass it into the program we must add
gui, submit, nohideto the beginning of the function. - This action will have an "if" statement. "If" statements must have a variable and parameter. Our variable will be "rad1" and parameter will be 1 or 0. Checked is 1, unchecked is 0
- The conditions must be enclosed in regular brackets, and the action must be in curly brackets. The action will be to change colors of the gui with
gui, color, white
change:
gui, submit, nohide

if (rad1 = 1){
	gui, color, white
}

if (rad2 = 1){
	gui, color, blue
}

if (rad3 = 1){
	gui, color, green
}

if (rad4 = 1){
	gui, color, red
}

return
Running the program
Running the program
We have completed the program, the code should look like so.
We have completed the program, the code should look like so.
SendMode Input  ; Recommended for new scripts due to its superior speed and reliability.
SetWorkingDir %A_ScriptDir%  ; Ensures a consistent starting directory.
#SingleInstance Force  ; Replaces old instance of script automatically.

gui, show, w500 h200, massi.net AutoHotKey starter kit

gui, font, s20
gui, add, text, x90 y20, Low complexity boilerplate

gui, font, s12
gui, add, button, x25 y+20 gshow, Show text in box
gui, add, edit, x+50 w200 vtext,

gui, add, button, x25 y+20 grun, Load checked programs
gui, add, CheckBox, x+20 vnotepad , Notepad
gui, add, checkbox, x+10 vcalculator, Calculator

gui, add, text, x20 y+30, Change GUI color
gui, add, radio, x+20 group vrad1 gchange, white
gui, add, radio, x+20 vrad2 gchange, blue
gui, add, radio, x+10 vrad3 gchange, green
gui, add, radio, x+10 vrad4 gchange, red
return

show:
gui, submit, nohide
msgbox,, Show text,%text%
return

run:
gui, submit, nohide
If (notepad = 1) {
	Run, notepad.exe
}
If (calculator = 1) {
	Run, calc.exe
}
return

change:
gui, submit, nohide

if (rad1 = 1){
	gui, color, white
}

if (rad2 = 1){
	gui, color, blue
}

if (rad3 = 1){
	gui, color, green
}

if (rad4 = 1){
	gui, color, red
}

return


guiclose:
exitapp
Adding some text to the edit and clicking our first button...
Seeing if our second button will load the program...
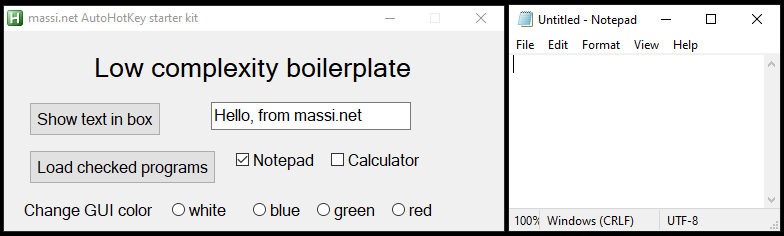
How are our checkboxes doing?...
Looking great! But one last thing. Why don't we compile it into an executable program so that it can run on any Windows PC regardless of AutoHotKey installation. Right click the file and click "Compile Script". Your .exe file will appear.
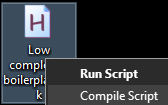
Your .exe file will appear.

boilerplate.ahk
Buttons
Show/Hide/Disable
 ShowHideDisable.ahk
gui, show, w200 h100, Show/Hide/Disable button

gui, add, radio ,vV1 gbutton1, The radio 1
gui, add, radio, vV2  gbutton1, The radio 2
gui, add, radio, vV3  gbutton1, The radio 3
guicontrol, disable, V2

return

button1:
	gui, submit, NoHide
	if V1 = 1
		GuiControl, show, V2

	if V3 = 1
		GuiControl, hide, V2
	return
Radio
 radio.ahk
gui, show, w200 h100, gui
gui, color, white

gui, add, radio, x10 y10 checked group vrad1 gradiolabel, white
gui, add, radio, x10 vrad2 gradiolabel, blue
gui, add, radio, x10 vrad3 gradiolabel, green
gui, add, radio, x10 vrad4 gradiolabel, red
gui, submit, nohide
return

radiolabel:
	gui, submit, nohide
	if(rad1==1)
		gui, color, white
	else if(rad2==1)
		gui, color, blue
	else if(rad3==1)
		gui, color, green
	else if (rad4 = true)
		gui, color, red
	return
Listbox
 listbox.ahk
Gui, Show, w210 h100
Gui,Add,ListBox,  w150 r5 8 vList1 gSubmit_All , Blue|red|green|yellow|
return

Submit_All:
Gui, Submit, NoHide
msgbox, % List1
return
Dropdown
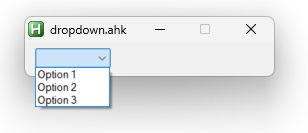 dropdown.ahk
Gui, show, w100 h35
Gui, Add, DropDownList, w75, Option 1|Option 2|Option 3
return
Tabs
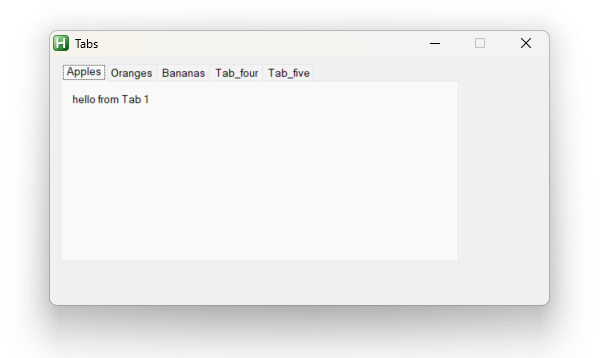 tabs.ahk
gui, show, w500 h250, Tabs

Gui, add, tab3, w400 h200  -wrap, Apples|Oranges|Bananas|Tab_four|Tab_five|
sleep 100

Gui, Tab, Apples
Gui, add, text,  x+10 y+10, hello from Tab 1
sleep 100

Gui, Tab, Oranges
Gui, add, text,  x+10 y+10, hello from Tab 2
sleep 100

Gui, Tab, Bananas
Gui, add, text,  x+10 y+10, hello from Tab 3
sleep 100

Gui, Tab, 4
Gui, add, text,  x+10 y+10, hello from Tab 4
sleep 100

Gui, Tab, 5
Gui, add, text,  x+10 y+10, hello from Tab 5
sleep 100

return
Templates
[Library] TAB v0.1 (Preview) - Add Functionality to the Tab Control
TAB_Library_v0.1.zip
MagicBox - Message Box Generator
MagicBox-1.0.4.7z
FindText - Capture screen image into text and then find it
FindText_GetText_JG.ahk
G33kDude/Chrome.ahk
Chrome.ahk_v1.2.zip