Core commands for effective Linux operation
What would be a simple procedure in Windows is a very different experience in Linux. Although capable of providing a desktop experience comparable to Windows/MacOS, it is primarily terminal based. Below are commands, functions, programs and procedures I often use to get the most of Linux's stable, flexible, and powerful operating systems.
-
Full update/upgrade
-
Update and upgrade the software packages (Debian systems)
-
sudo apt update&&sudo apt upgrade -y✂
-
Programs
-
Curl
-
Transfer data and run scripts with URLs
-
sudo apt install curl -y✂
-
Run bash scripts with curl
-
curl -sSL https://massi.net/scripts/hello.sh | sudo bash✂
-
-
OpenSSH
-
Secure network communication and remote access.
-
sudo apt install openssh-client -y✂ -
sudo apt install openssh-server -y✂
-
Disk operations
-
Format drive
-
ext4 is the default filesystem for Linux. Other filesystems could be mounted but would be limited in features. (permissions, performance, journaling, etc.)
-
sudo lsblk✂
Unmount drive
-
sudo umount /dev/sdb✂
Format drive to ext4 *erases drive*
-
sudo mkfs.ext4 /dev/sdb✂
Identify drive (I.E: /dev/sdb)
-
-
Permanently mount drive with fstab
-
Create the mount point
-
sudo mkdir /mnt/4TB✂
Identify drive (I.E: /dev/sdb)
-
sudo lsblk✂
Mount drive
-
sudo mount -t ext4 /dev/sdb /mnt/4TB✂
Get drive UUID and type
-
sudo lsblk -o NAME,FSTYPE,UUID,MOUNTPOINTS✂ -
sudo nano /etc/fstab✂
fstab entries have the following format:
-
sudo findmnt --verify✂
*do not reboot if there are errors/warnings. An invalid fstab can render a disk unbootable*
Edit fstab
[UUID] [mount-point] [type] [options] [dump] [pass]
#4TB Disk
UUID=b09bb4c8-de4d-4ce6-a93f-30c4c9241a58 /mnt/4TB ext4 defaults 0 0
Test fstab -
-
Bind folders
-
Attach the contents of one directory to another location in the file system.
-
sudo mount --bind /var/www/html /mnt/4TB/apache_html✂
-
sudo nano /etc/fstab✂
The # line is a comment
First location (I.E: /var/www/html) is the source, the original directory that you want to bind to another location. The second (I.E: /mnt/4TB/apache_html) is the target directory, the location where you want to bind the source directory.
Edit fstab
The format for a --bind entry is [source directory] [target directory] [none] [bind] [0 0]#sudo mount --bind /var/www/html /mnt/serveuse_ext4/serveuse_apache /var/www/html /mnt/serveuse_ext4/serveuse_apache none bind 0 0
Test fstab -
-
sudo findmnt --verify✂
*do not reboot if there are errors/warnings. An invalid fstab can render a disk unbootable*
For desktop experience
-
Nautilus-admin
-
Facilitate navigation by allowing right clicking to elevate as admin
-
sudo apt install nautilus-admin -y✂
-
-
Xscreensaver
-
Large collection of screensavers
-
sudo apt-get install xscreensaver xscreensaver-data-extra xscreensaver-gl-extra✂
-
-
Create folder/file shortcut
-
Navigate to folder where shortcut will be placed
-
cd /home/user/Desktop✂
Create link to file/folder
-
sudo ln -s /etc/file.txt✂
-
Apache web server
- This is necessary when installing any Linux program
- "-y" will automatically accept any prompts
- Your local IP address is the address of the web server
- Visit the IP address in a browser to view Apache's landing page
- I.E: http://192.168.1.215/
- We will back up and rename the original default page
- We will use nano as the text editor
- Press Ctrl+o then Enter to save in Nano
- Press Ctrl+x to escape back to the Terminal
Create a quick Apache web server in Linux
Local website
We will start this web server with a simple web page that will be viewable from the local network.
Installing Apache
Update packages
sudo apt-get update -y ✂
Install Apache2
sudo apt install apache2 -y ✂
Open the firewall for Apache
sudo ufw allow "Apache Full" ✂
View your website locally
ip address | awk '/inet / {print $2}' ✂
Editing your site
Edit the default page
sudo mv /var/www/html/index.html /var/www/html/apache2_default_page.html ✂
sudo nano /var/www/html/index.html ✂
Copy this code into the text editor and save
Samba file server
- This is necessary when installing any Linux program
- "-y" will automatically accept any prompts
- "-p" will automatically create the parent folder
- Adds the smbgroup for the smbusers to the system
- No home directory
- Members of smbgroup
- Cannot log into host system
- The "-R" flag is for "recursive" which will apply the changes to all child folders
- You want to stop the service while making edits to it
- We will back up and rename the original configuration file
- We will use nano as the text editor
- Press Ctrl+o then Enter to save in Nano
- Press Ctrl+x to escape back to the Terminal
- This is your server's name on the network
- In Windows it will appear as \\hostname
- This command will display your server's hostname
- Enable SMB Server/Client feature
- Turn on file and printer sharing
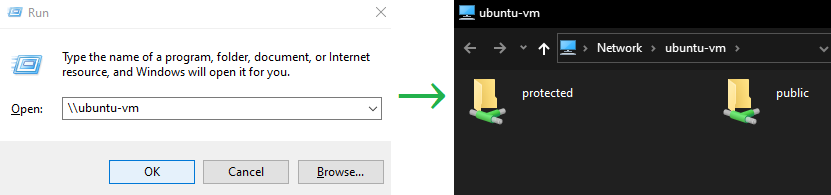
- Open the run dialogue in Windows (Windows Key + R)
- Run
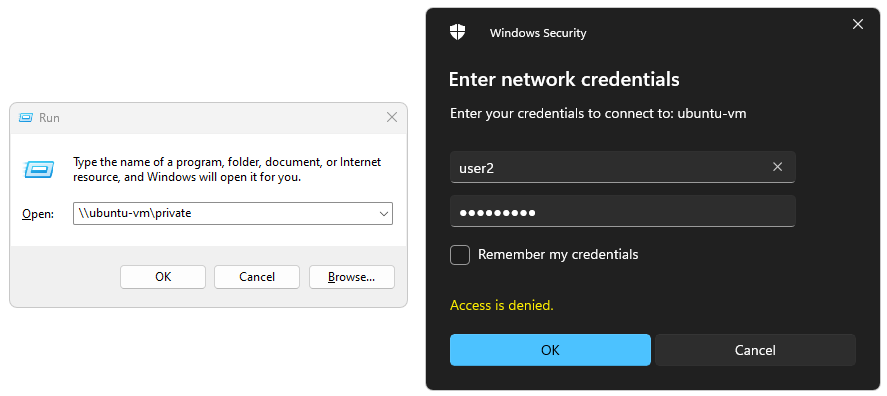
\\-ip-address-of-server- - This user will not have a home directory nor login for the system
- The user will be named user2
- You will be prompted to create a password
- As a private directory, you can only connect to it with the direct address
- Run
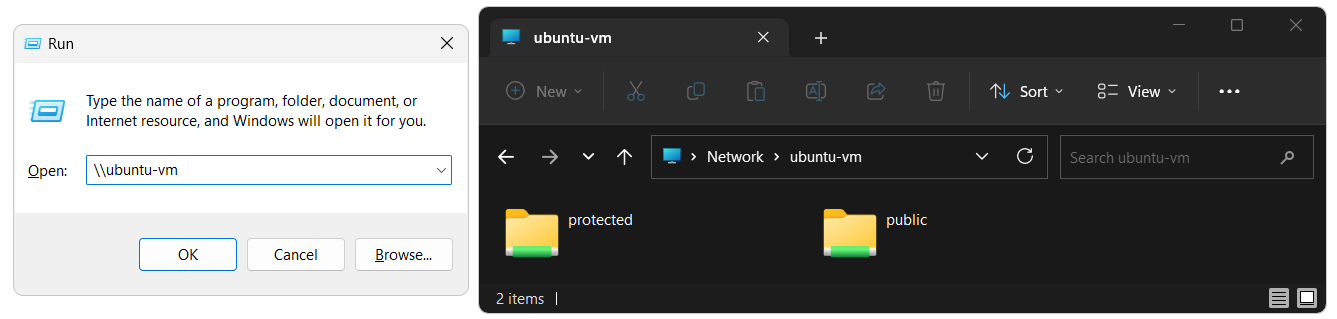
\\hostname\privateand enter user2's credentials - Your hostname may differ, mine is ubuntu-vm
- Set the permissions for the folders leading up to and including
samba_foldersto 775
Create a quick Samba file share server in Linux
Public + Protected folders
We will start this file server with two folders, each with their own unique function.
The "public" folder will be completely open to all and anyone on the network can read, add, remove, or modify it's contents
The "protected" folder will be visible to all but it's contents cannot be modified.
Installing Samba
Update packages
sudo apt-get update -y ✂
Install Samba
sudo apt install samba -y ✂
Open the firewall for Samba
sudo ufw allow samba ✂
Creating the folders, users and groups
Create folders
sudo mkdir -p /share/public ✂
sudo mkdir /share/protected ✂
Create smbgroup
sudo groupadd --system smbgroup ✂
Create smbuser
sudo useradd --system --no-create-home --group smbgroup -s /bin/false smbuser ✂
Make smbuser and smbgroup own the folders
sudo chown -R smbuser:smbgroup /share ✂
Give smbgroup write access to the folders
sudo chmod -R g+w /share ✂
Configuring Samba
Stop Samba
sudo systemctl stop smbd ✂
Edit the Samba configuration file
sudo mv /etc/samba/smb.conf /etc/samba/smb.conf.bak ✂
sudo nano /etc/samba/smb.conf ✂
Copy this configuration into the text editor and save
Start Samba
sudo systemctl start smbd ✂
Check if Samba is running
sudo systemctl status smbd ✂
View your hostname
hostname ✂
Connecting to Samba from a Windows client
Enable file sharing in Windows with Powershell
Enable-WindowsOptionalFeature -Online -FeatureName "SMB1Protocol" -All ✂
Set-NetFirewallRule -DisplayGroup "File And Printer Sharing" -Enabled True -Profile Any ✂
Connect to Samba from Windows
Private folder
The next folder on the file server will be private.
Hidden from public view and only accessible to "user2" with the right credentials.
Create folder and user
Create user for the system
sudo useradd -M -s /usr/sbin/nologin user2 ✂
Create private folder
sudo mkdir /private ✂
Give user2 permissions to folder
sudo chown -R user2:user2 /private ✂
Give user2 write access to the folder
sudo chmod -R g+w /private ✂
Configuring Samba
Stop Samba
sudo systemctl stop smbd ✂
Add user to Samba
sudo smbpasswd -a user2 ✂
Edit the Samba configuration file
sudo nano /etc/samba/smb.conf ✂
Append this to your smb.conf file and save
Start Samba
sudo systemctl start smbd ✂
Connecting to a private directory from Windows
You will be prompted for a username and password. Enter your credentials
The private directory appears, with read/write access

It is not visible to other clients
Moving Samba folders to a secondary drive
Generally, the drive with the operating system is not the main data store.
Let's move the Samba folders we made to secondary drives with large storage capacities.
Set permissions to parent folders
Say your drive is mounted at
/mnt/4TB and you want your folders to sit in /mnt/4TB/samba_folders,the folder
samba_folders and those leading up to it must have editing permissions for the owner and group and read permissions for all.
sudo chmod 775 /mnt ✂
sudo chmod 775 /mnt/4TB ✂
sudo chmod 775 /mnt/4TB/samba_folders ✂
Copy the folders to the new destination
The rsync command with "-avz" flags will
sudo rsync -avz /share/public /mnt/4TB/samba_folders ✂
sudo rsync -avz /share/protected /mnt/4TB/samba_folders ✂
sudo rsync -avz /private /mnt/4TB/samba_folders ✂
Give user2 permissions to folder
sudo chown -R user2:user2 /private ✂
Give user2 write access to the folder
sudo chmod -R g+w /private ✂